skip to main |
skip to sidebar
The colors for this week at SOC are orange and hot pink. I do like these colors together. I am going to be busy the rest of this week and may not have time to post again, so decided to post today. I used these colors for three different projects, the first being this ATC:
The background was made with a Hero Arts, stencil and background stamp and a Impression Obsession cover-a-card stamp. The large heart is a Sizzix die and the medium heart is one that I hand-carved. The small heart is a punch from EK Success.
Then, I made this card:
A new circle stamp from Hero Arts was used for the background and for the rest of the card. As you can tell, I do have a lot of Hero Arts stamps!!
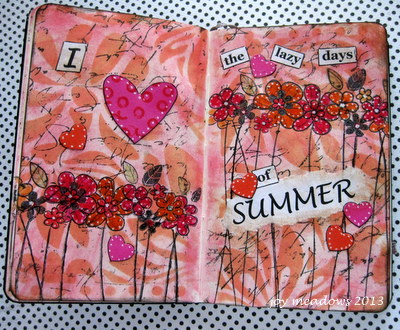
And then I did an art journal page in my new Moleskine journal:
This spread turned out a bit murky to me. In hindsight, I would have omitted the script overstamping or, at least, used a lighter ink color for it. Friday will be the first day of summer and, I am looking forward to lots of lazy days!!! Summer goes by way too fast in my opinion.
I am also linking this post to the Glue It Tuesday Week #14 challenge.
Hope your day is a great one!
Last week, members of the Summer of Color, sponsored by Kristin, the owner of the Twinkle, Twinkle blog, were asked to vote for their choice of a color combination to use for this week's art projects. The colors chosen were citron green and turquoise.
First, I created my background by combining Dylusions lime green spray ink with some squeezed lemon distress ink on a craft sheet. I pulled white cardstock pieces through the inks and let it dry. Then I added some Dylusions turquoise spray to the sheet and added that to the previous colors. I repeated this process until I was happy with the results. Some random stamping with a Magenta dandelion was done with salty ocean distress ink.
Here is the first ATC I made, which I will enter into the Simon Says Stamp and Show challenge, since I do have one tiny button on the butterfly.
The die cut butterfly was sprayed with Dylusions blue ink. I let it dry and then used a polka dot stamp dipped in water to "bleach" some spots on the butterfly. Turquoise Stickles were added to the dots.
My next ATC was created in much the same way, using ArtChix Studio clipart, a sentiment and some dew drops.
I do love to use touches of black on most anything I make because I like the contrast.
Lastly, I made this tag:
A stencil, white gel pen, die cut flowers, Tim Holtz and Wendy Vecchi stamps, glitter and seam binding dyed with distress inks were used for this tag.
Have a wonderful day!
Finally finished my pages for a gypsy deco book page swap at Paper Traders Yahoo Group. I had a lot of fun making these:
Lots of steps, but I think they turned out pretty nicely. We are only required to make six pages, but I made an extra one for me to add to my book when I get it back.
I used Dylusions spray inks for the backgrounds of these 3.5 inch square pages. The clipart image was colored a bit with colored pencils. The flourish stamp is from Stampington & Co. and I gold embossed it along the left side. Also edged each page with gold embossing. Sequins were added and words generated by computer.
Here is an ATC I made for the monthly lottery for June at Paper Traders.
Everything I used on this ATC is from ArtChix Studio except the little flowers and "lady luck". I enjoy making ATC's for this lottery and, there's always the chance that I might actually win and receive some fabulous creations to enjoy.
I'm running behind on my altered book pages for our little group, Mo Jo Nee'. Gotta' get started on them this weekend for our exchange next Wednesday.
Till next time . . . .
This week I haven't had much time for any fun things due to the holiday and also, helping my daughter move. However, I did make a couple of ATC's. The first one is for the monthly Winner Takes All lottery in the Paper Traders Yahoo Group:
The background is from a Gelli plate print. I have a lot of old postage stamps and loved this one with the umbrella on it. I used an EK Success punch along the top to mimic rain. A rubber stamp with tiny lines was also used for rain and I used a glitter pen to add highlights here and there along those lines. A portion of a Sizzix flourish die cut from another Gelli print added a border at the bottom. The words were computer generated and colored with distress ink. I like cutting the ATC a bit smaller and mounting it on black cardstock cut to the exact size; this gives it a nice frame. One little black opal gem accents the top of the umbrella.
This next one will be offered as a trade:
The image is one from a Somerset Studio collage sheet. Rubber stamps and distress inks were used for the background. The bird is also a rubber stamp. The circles are plain white reinforcement labels colored with distress ink. The word was cut from an old book. A black Sharpie was used for the dots all around the edges.
Loved making these - am hoping to make some pages for a deco book swap this coming week.
were my inspiration for this book page that I made for my friend, Maureen's, Halloween book. This page was for the first exchange we did in April:
I found the quote somewhere online and that was my starting point. Random strips of patterned paper were cut and fashioned into a fence for the large crow to sit upon. More patterned paper, a chipboard jack-o-lantern and some sparkly pipe cleaners were added. Here is the back of this page:
The focal image is from a collage sheet and it was framed in with some copper German scrap. The paint spatters are actually a stamp from DeNami Designs. I used a Tim Holtz ticket to add my name and date for this page.
I also wanted to share with you a little book I am working on using Gelli print pages.
My Gelli plate is the 6 x 6 size, which is perfect when making cards and smaller projects. I selected several prints to use and cut them down to 5.5 x 5 inch pages, or smaller. Some of these pages have prints on the back and some do not. I will just add more inks or stencils or stamps to them as I go.
I punched two holes for the binding and threaded a fuzzy hairband through them from the back. A pair of chopsticks were used to hold the band - looks pretty and cool!! :*) The sequins were all the embellishment I wanted because the print itself is so gorgeous.
Have a wonderful weekend!
This week I played with some Dylusions spray inks that I purchased a few weeks ago. They are beautiful and so very vibrant. Initially I only purchased three colors, but I will definitely be getting more colors as my budget allows!
These ATC's are for a Paper Traders swap called Chirp Chirp. I got a partial sheet of gift wrap at a barn sale last year for 25 cents. There were lots of birds, nests w/eggs and butterflies on it. For the background, I sprayed a full sheet of cardstock with water and then the blue and green ink sprays. I added another spray of water to help blend the colors and then let it dry in the sun. Then I splattered some watered down white acrylic paint over the whole sheet. After that was dry, I stamped a small flower image randomly with salty ocean distress ink. The collage came together so easily and I love the German scrap trim to ground it all! The small white butterfly die cuts were sent to me by a friend and were the perfect accent. The alphabet letter die is from Memory Box. I am very pleased with the way these turned out and had so much fun making them!

Here is the front of the page I did for my friend Maureen's book. Recently she has been seeing spiders here and there inside and outside of her house, so I thought this would be a fun page for her.
The back of the page is open at the top to make a pocket to hold the tags I made with spider poems on them. I used some fluffy yarn for ties on the tags and, serendipitously, the yarn hangs over the front of the page and kind of adorns the girl's hair!! Cool. Here are the tags:
And, here is the front of the page I did for Renee's book:
Just some clip art of Paris fashions that I colored a bit and added some gems to the dresses, etc. Some French papers, lace and trim were also added to the page. Here is the back of her page:
To go along with her page I made a tag booklet with fashions from the early 1900's on each tag. She will be able to tie this to one of the binder rings of her book.
Thanks for sticking with me for this long post - I really enjoyed making these things this week and hope you enjoy seeing them! Thanks for visiting!
This week I have been busy with a doctor's appointment, yard work and some long overdue housework, too. But I did find a bit of time for playing in my studio.
I wanted to participate in an inchie accordion book swap for the Paper Traders yahoo group. This needed to be postmarked by April 30th. I managed to get mine done in time to mail them on Monday, the 29th. Here is the masterboard I created from which the inchies were punched:
I used distress inks in the colors of picked raspberry and peacock feathers - I just love those colors together!!
And here are my little books:
I sponged delicata gold ink around the edges of each inchie. The sentiment is a rubber stamp from Hero Arts that I have had for years. A few sequins here and there are the only added embellishments, as I wanted to keep it simple and easy to mail. I made one extra book for myself to keep with the four that I will be receiving back in the swap.
I am still working on book pages for my friends' books and hope to have them done for my next post.
Have a great week!